Expose Any Property with a LiveClassAsset
Many features are still experimental and breaking changes may occur.
A Live Class Asset lets you operate a scene component's properties and methods from the Remote App without writing a script. It can also expose classes you can't attach attributes to, such as Unity's built-in components and third-party components.
For how to expose values by attaching attributes to your own scripts, see Expose Parameters to the Remote App with LiveProperty.
This page walks through an example that exposes an AudioSource's volume as a slider, with Play/Stop as buttons.
How It Works
Exposing a member involves three pieces:
| Piece | Role |
|---|---|
| Live Class Asset | The asset that declares which members of which class to expose. Independent of any scene |
| Where it's applied | Where the asset is enabled: Project Settings (project-wide) or a Remote Control Container (that scene/set only) |
Objects on the Remote Control Container | Which objects to expose. Among the components on a registered GameObject, those belonging to a declared class are exposed |
Light (enabled / color / intensity / shadows / spotAngle) and PlayableDirector (Play / Stop / Pause) are already exposed via UnityBasicLiveClasses, applied by LiveStudio's Live Studio System prefab. Just registering the GameObject in Objects is enough to operate these.
1. Create a Live Class Asset
- Open
Window > Lilium Remote Control > Live Class Asset. - Press
Newnext toPresetin the header and choose a save location to create the asset.
You can also create one from Create > Live Studio > Remote Control > Live Class Asset in the Project window and assign it to Preset.
2. Add a Class
In the class list on the left of the Classes tab, add the class you want to expose.
+— Search across all Component / ScriptableObject classes (grouped by namespace).From Selected— Choose, viaAdd, from the list of components on the GameObject currently selected in the Hierarchy.
In our example, select a GameObject that has an AudioSource, press From Selected, and press Add on AudioSource.
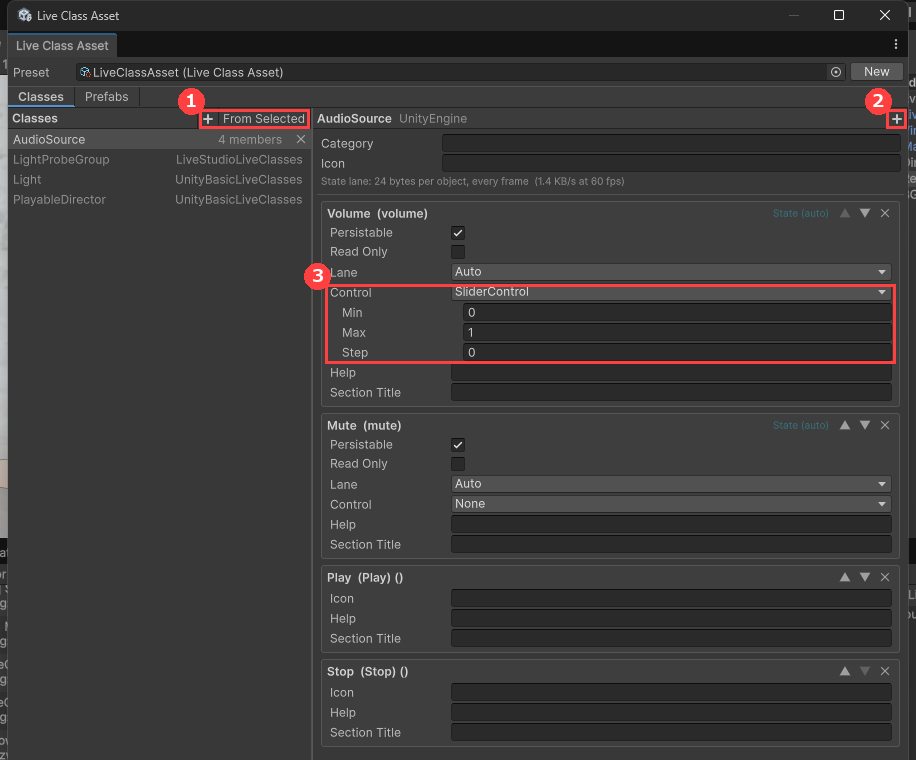
① + / From Selected to add a class (step 2) ② + to add a member (step 3) ③ volume's slider settings (step 4)
Classes already declared in another asset (such as UnityBasicLiveClasses) also appear in the class list, along with that asset's name.
3. Expose Members
- Select the class you added in the class list.
- Press
+in the detail pane on the right to open theAdd Memberwindow. - Check the members you want to expose. The window can stay open, so you can select multiple members at once.
The candidates shown are:
- Public properties and fields whose type is
bool, an integer type,float,double,string, an enum,Vector2–Vector4,Quaternion,Color,Rect,Bounds, and similar (a property with no setter is shown as(read only)) - Public methods with no parameters (shown as buttons in the Remote App)
In our example, check volume, mute, Play, and Stop.
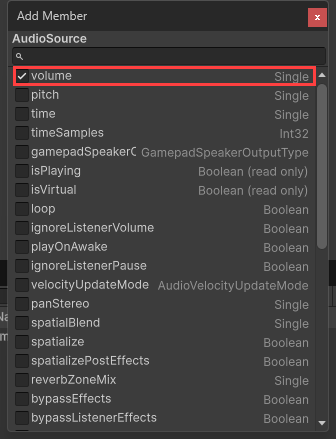
The label shown in the Remote App is generated automatically from the member name (useColorTemperature → Use Color Temperature).
4. Configure Display and Persistence
At the top of the detail pane, configure display settings for the whole class.
| Setting | Contents |
|---|---|
Category | The category in the Remote App. Binding if left blank |
Icon | The icon shown in the Remote App (a Material Icons name). The class's default icon if left blank |
Below that are settings for each exposed member.
| Setting | Contents |
|---|---|
Persistable | Save and restore the value in the live scene (*.live.json) (on by default) |
Read Only | Show the value in the Remote App but disallow writing to it |
Lane | How the value is recorded into live data. Usually leave it at Auto |
Control | The display control. SliderControl (Min / Max / Step) for a slider, HideControl to hide it from the Remote App's UI. None for the type's default control |
Help | Help text shown in the Remote App |
Section Title | Start a new section from this member. Entering one also lets you set Subtitle and Icon |
Icon (methods only) | The icon shown on the button (a Material Icons name) |
In our example, set volume's Control to SliderControl, with Min set to 0 and Max set to 1 (③ in the step 2 screenshot).
- Use
▲/▼in the top right of each member to reorder it, and✕to remove it from exposure. - The badge in the top right of each member (
State/Event/None) shows how that member is recorded into live data.
5. Apply the Asset
An asset you create isn't reflected in the Remote App until it's applied somewhere. While it isn't applied, a warning is shown in the window's header.
- Apply it project-wide (the usual choice) — Add it to the
Live Class Assetslist inEdit > Project Settings > Lilium Remote Control. The first time you edit this, a project settings asset (Assets/Settings/RemoteControlProjectSettings.asset) is created, and it's included in builds. - Apply it per scene/set — Add it to the
Assetslist of that scene'sRemote Control Container. Placing it in the container inside a set (.set.lsb) keeps it active only while that set is loaded.
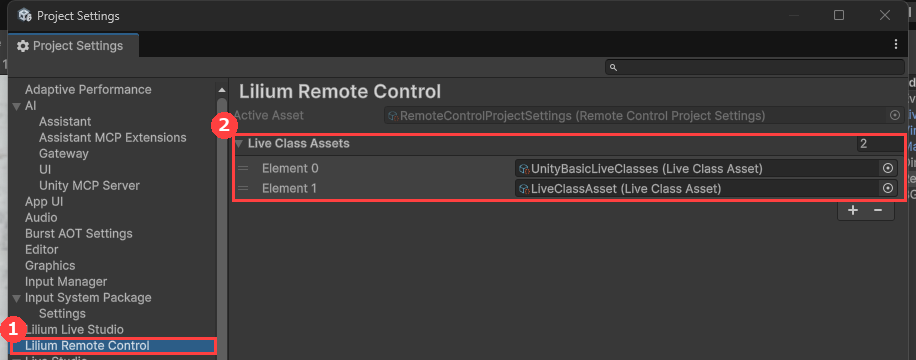
① The Lilium Remote Control page ② Add the asset you created to Live Class Assets
6. Register the Object
Register the GameObject that holds the component you want to expose in the scene's Remote Control Container.
- Select the
Remote Control ContainerGameObject and press+onObjectsin theRemote Control Containercomponent. - Choose
LiveGameObjectfrom the type dropdown. - Drag the GameObject that has the
AudioSourceintoReference.
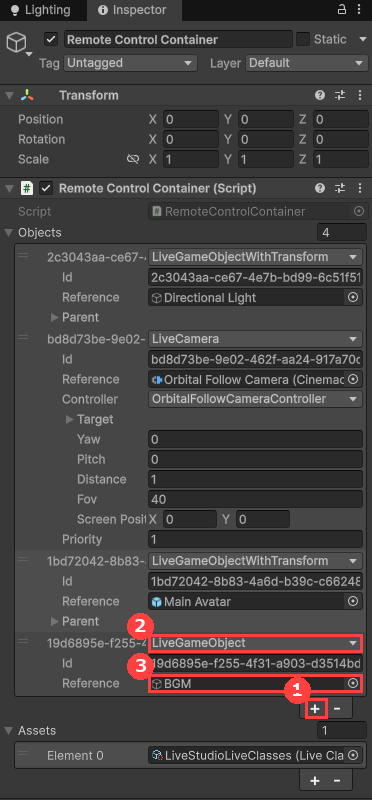
① + to add an entry ② Choose LiveGameObject ③ Assign the GameObject to Reference
If the GameObject is already registered, this step isn't needed — components of a declared class are exposed automatically.
If you want to register a specific component on its own, rather than the whole GameObject, choose LiveComponent instead of LiveGameObject and assign that component to Reference.
7. Verify the Behavior
Press Play in the Unity Editor, or launch the built app and connect from the Remote App. Opening the GameObject on the Remote App's "Live Scene" page shows the AudioSource's Volume as a slider, and Play / Stop as buttons.
Edits made in the Live Class Asset window or Project Settings are reapplied immediately, without waiting for a domain reload.
Related Links
- Expose Parameters to the Remote App with LiveProperty — How to expose values by attaching attributes to your own scripts
- Live Scene — About the live scene where exposed values are saved
- Export a Set — How to export a set including its
Remote Control Container - SDK Components — The structure of the SDK, including the
RemoteControlpackage